Wednesday, May 28, 2014

Work in Process Wednesday

I mentioned a few weeks ago that I really wanted to get a bunch of partially completed projects finished. I really want to finish up a bunch of WIPs and work through a lot of my stash. It just doesn't make sense to have a personal stash anymore, at least not with yards and yards of individual fabrics. Sure I am going to keep and work through the stuff I have, but I really only plan on buying personal stash to complete projects. I am sure I will need backgrounds, since I have a tendency to buy the big colorful prints, and fat quarters and half yards of blenders, butbdon't tend to buy backgrounds. So, I will definitely continue supporting my local fabric stores, but in a different way....

So, here's the projects I worked on this week....

Crackers - a great beginner paper piecing pattern, that is layer cake friendly. I use a layer cake of brown sugar by Hoffman. It's a nice subtle project. I think I will turn it into a wall hanging....


Perfect Posies - so I opened this project to work on it and quickly understood why I had put it away...
I started this project a couple of years ago in a class and put it away shortly after. I must have realized that I didn't like the contrast, and set it aside, hoping it would get better or that I would come up with an alternate plan for it.

It started with this fabric....a Hoffman Christmas print. It's cut out using the stack and wack method to cut 4 perfect copies, and then you twist and turn the fabrics until you get a pleasing repeat. It's a little more forgiving than traditional stack and wack in that you can twist and turn until you find one you like, sometimes with traditional stack and wack the block isn't great.....


After you cut the fabric, and make the stack and wack block, you wrap it in an inner border. I made 75 with dark green inner borders.


And 25 with dark maroon inner borders.


Once the inner borders are on, you add another set of stack and whacked triangles, and another PAIR of borders. So, if you are a math kinda person, you realize that this block us up in the 16 1/2" size....and with 100+ blocks this quilt would be HUGE, even by my standards, which is bed size....


And of course, I have only 1 - 6" strip of the focus fabric ( a no chance of finding any more of it). And various amounts of border fabric. I had obviously intended to use the lighter pink as the outside border for the alternate blocks. 


And so now, it's back to the drawing board.....at least for now.

On other finishes.....I completed my booth aprons. I made three, one for me and 2 for any one working in the booth with me. They are from the pattern "Girly Tool Belt", with a few alterations. It's a great pattern. Easy to follow, and totally customizable. 


And that is in for this week....what have you been working on?

Catherine


Tuesday, May 27, 2014

May Updates -- just a bit early


It's not quite the end of May, and this post is a few days early, but the remainder of the month is full of dentist appointments, new baby visits (she is adorable!!!) and what are bound to be a million last minute errands before a long weekend away at quilt retreat. I'm not sure how much I will get to post before the end of the month, but I wanted to update you on some progress items for the Month of May.

Of course, I also have a stash reduction plan which officially started on May 1st, and as per normal, priorities constantly change....so here's how it has changed and what we have happening around here....


The goals as stated at the new year are in black, amendments (changes/additions, etc) are in blue, and status is red....

Piecing
1. Captain's Wheel complete and sent to the quilter, due back next week
2. Celtic Wave (Queen) - Piece Along to start in mid-February! top finished on Sunday!!! Back made today. Packed and ready to go to the quilter as soon as I make it to the post office.
3. Flower's for My Wedding Ring - Got all of my fabrics picked, my backgrounds cut out, and am ready to get started with piecing. (No change since last month)
4. Scrappy Trip (80 pairs prepped), 8 blocks finished (no change since last month)
5. Osprey's Nest All done. Pieced, quilted, bound and hanging at Cozy Quilt Shop at the moment. We did not have a chance to do a photo shoot due to the weather, but I promise to do one as soon as I get it back.
6. Hawaiian/Prairie Star - Added in April, I have cut it all out. and I will be taking it on retreat this weekend. So fingers crossed a lot will get accomplished.
7. Fire Island Hosta Queen - Added in April. I have cut this one out as well. I should take it to retreat, but that might mean I get neither done...so we'll have to see.

Quilting
1. Winter Wonderland - on the way back from the quilter (I got the shipping notice on Friday).
2. Glacier Star - this one remains on display for classes, so I have no idea when I will get it to send it to the quilter.
3. Mariner's Compass done. Quilted and bound.
4. Compass Rose - at the quilter
5. Meandering Star - done. 
6. Captain's Wheel - at the quilter
7. Celtic Wave Queen - packed and ready to go
8. Flower's for My Wedding Ring - 
9. Scrappy Trip
10. Osprey's Nest - Done.

Pattern Writing
1. 2014 Block of the Month - starts on January 13th! - Done. started February 13th. whole year worth of patterns have been scheduled!!! Yippee!!! Have you been following along???
2. 5 new patterns for spring market - all done!!! I'll be introing all of the patterns over the next few weeks.
3. 5 new patterns for fall market

Other projects :
1. Amazon Star finished
2. Pepperdish finished
3. Crackers finished
4. Feathered Star Queen finished
5. Project Destash - current total is -34.25

Retreat Plans :
Retreat is this weekend, and we are headed to Temecula (about 25 miles away for 52 hours away from home). 52 hours devoted to sleeping, eating, sewing, and potentially a little relaxing (and possibly some swimming, but we'll see). It's  small group, just 10 or so of us, and I am super excited to just hang out and work on things without needing laundry breaks, and food breaks, and cooking breaks, and shopping breaks. Just me, some projects and a sewing machine.

I've been debating what to take.....I generally like to take a couple of projects. 1 that just needs something quick -- something that can get accomplished quickly (for motivational purposes). I also like to take something that needs hand work -- either a binding or some hexes or some appliqué, or even some cross stitch. Something that I can do on the couch when I am tired of sitting in the same position in the same chair. And then I take a project that I want to power sew on -- usually a big commitment project. I like to have it cut out and bagged, and ready to sew before I leave, so that I can get there and power sew for a couple of hours before everyone gets there.....so that's my "philosophy" on retreat packing....

Which roughly translates to this :
Gabriella's Birth Announcement (hand work)
Giselle (stash buster + 10th anniversary gift + just needs webbing and borders)
Hawaiian Star or Fire Island Hosta -- I guess it will depend on whether I can get these cut out this week....


And now that I have stated my goals for the year, they are bound to change. Market was amazing, the things that I got to see where fantastic, and I didn't even attend in person, just vicariously!!! I'll be demoing some new things, and working on some new things.....if you want to see them more often than I blog, make sure to follow me on Instagram @queeniequilts as I tend to update every day or so (though I must admit there are an awful lot of Penny candids in there......

How are you doing on your quilty goals for the year???

Happy Quilting!!!

Catherine

Monday, May 26, 2014

Celtic Wave QAL - WrapUp

So, it's Memorial Day, I didn't plan that. In fact, this is going to be a really quick update as I run out to hang out with my family for the day.

I finished my Celtic Wave! I'm not in love with it....but sometimes it takes quilting to make me love it, so we'll have to hope until it returns......so for now, it is headed out to Montana, and we'll see if I love it when it returns.

Don't get me wrong, I really like it. I love the colors, which are fisher in real life. I love the pattern. I think the issue is the amount of background, and the fact that it is cream....it's just super light which in my life is a bit impractical.....so, we'll see....


My Celtic Wave...

Have a great Memorial Day. We're heading to the cemetery to put out some flags and visit some of our special heroes....

Catherine

Saturday, May 17, 2014

Curved Binding Tutorial


Quick warning -- this is a photo heavy post. It was really the only way to do this other than making a video, and I really need to record this with someone who could film during the process, and as much as I love my Penny-dog, and think she is the smartest dog in town, she doesn't really have opposable thumbs....So stills will have to do for now.

If you have any questions about this process or post, please comment or email me and I will attempt to explain....It is a complicated process and not routinely required for quilts, so I completely understand if you skip over it....

Curved Binding Tutorial

Curved binding is perhaps one of the hardest things I have ever done in the quilting world...and then I found out that it is not all that hard, just a bit tedious and time consuming. Here’s the step by step (with photos) tutorial on how to do.

For this tutorial, I just used a piece of FMQ practice sandwich that I was working on last week, and I just trimmed it in the same curve as my bali wedding star. As you know, the Judy Niemeyer Wedding Ring series quilts all use the same curve, so you can use this on any of them. So let’s get started. If you are doing a different curve, you will need to make a different template.

Tools you will need :
Mylar template plastic
Sharpie pen
Chalk marking pencil (I use a sewline chalk pencil)
Roxanne's Glue Baste It
Pins (I like clover fine lines)
Rotary cutter (for cutting the mylar)
6 1/2" x 12 1/2" ruler
cutting mat
iron


For this process, the light teal is the front, and the navy is the back of the quilt.


  1. Let’s start by making your template that you will use near the end of this activity. It’s just easier if it is already done. So, here’s how you make it. 
    1. You will need a piece of mylar template plastic, I actually prefer a colored plastic, rather than clear, but frosted will do it a pinch, and I didn’t have anything but frosted so I made mine in frosted.
    2. Secondly, you will need to decide what size your binding will be. I like 2 ½ or 2 ¼ inch, either one is fine, it’s your choice.
      1. Take the size of your binding, and divide it in half.
        1. 2 ½” / 2 = 1 ¼”
        2. Cut a piece of mylar at 1 ¼” wide by about 3” long.
        3. Now, make some markings on your mylar.
        4. The first mark is at ¼”. and should go from the top to the bottom of the mylar piece, parallel to the long edge.
        5. The second mark is at ¼” as well, and runs parallel to the smaller edge.
        6. And now the hard part. If you are a visual person, please refer to the picture...because this description might make you more confused.
        7. Measure the half way point between the 1st mark, and the opposing edge, along the ¼” drawn line…..
        8. Now draw another pair of lines...both originating at the point established in #7 above. One goes to the intersection of the original ¼” mark and the top edge, and one that connects to the opposing edge. Basically, you will have a V across the top.


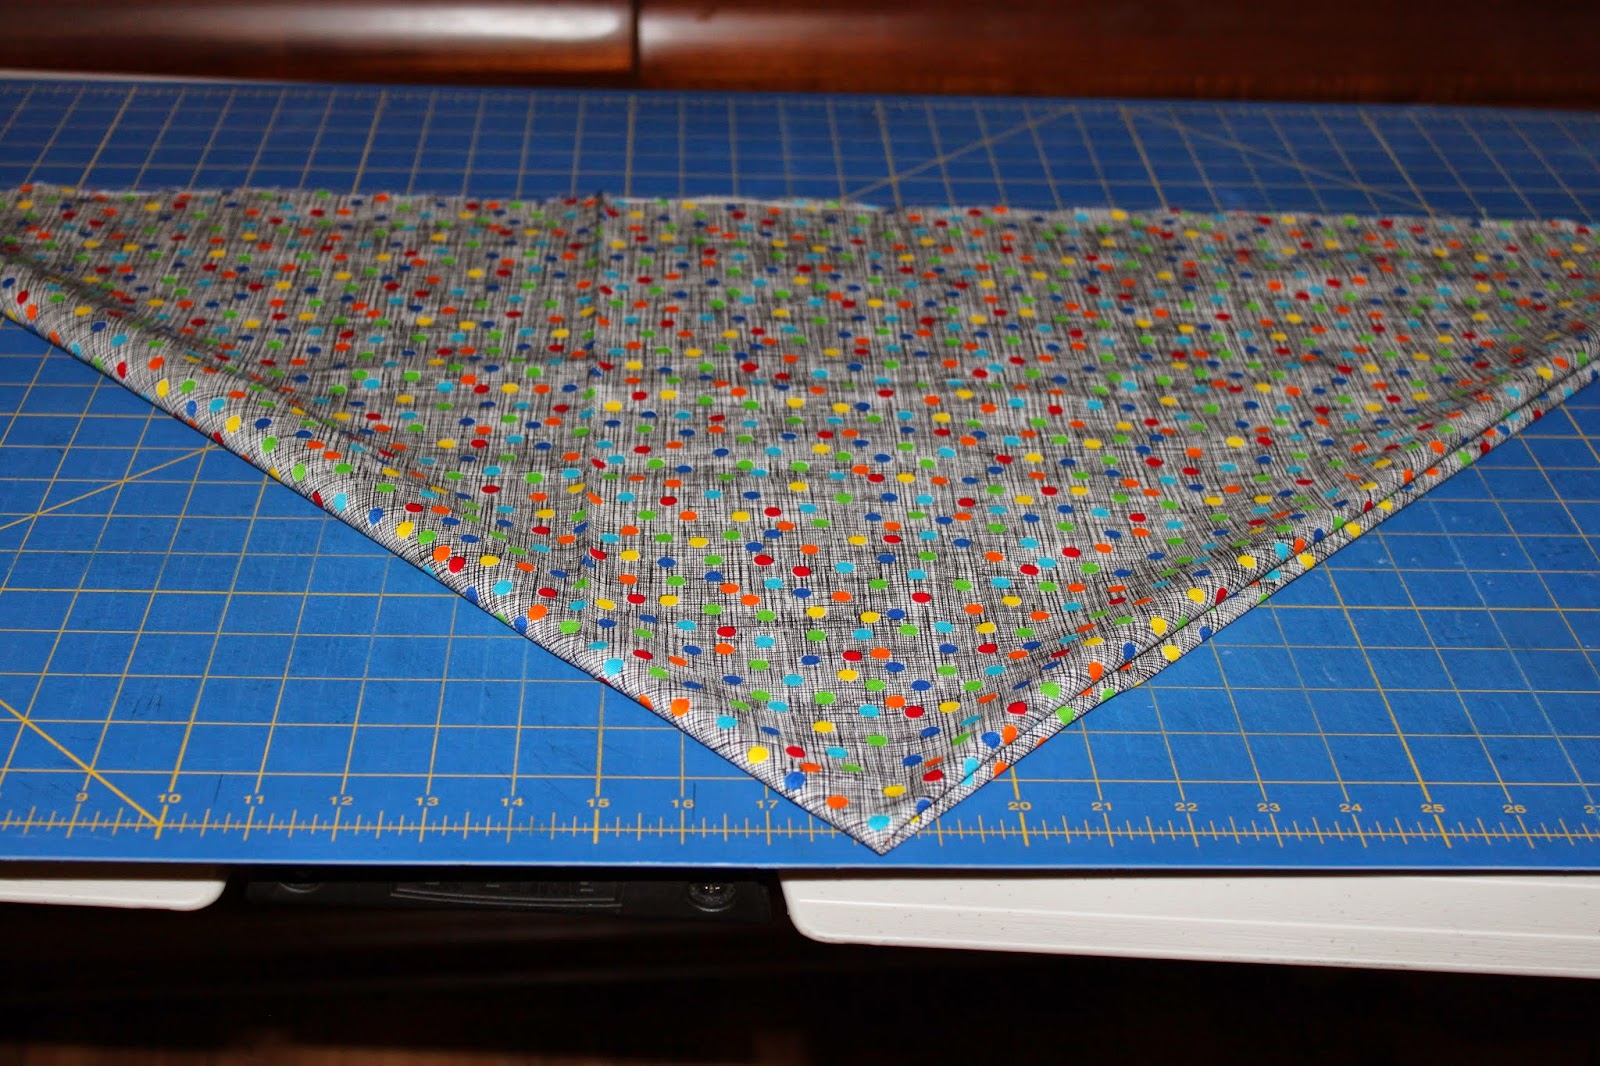
  1. Now, make your bias binding….First, cut a large square. In my case, I made a 36” square. Cut your 1 yard piece, and then fold it up from bottom right to upper left until the left edges are lined up. Once it is lined up, cut off the piece at the top (which is not part of your square. Now fold the lower left hand corner to the upper right hand corner. You will have a large triangle, which has 4 layers of fabric, and each of the folded edges are on the bias. If you are right handed, trim off the left folded edge, if you are left handed, trim off the right folded edge. Now, cut your 2 ½” strips from your original trimmed edge. each of these strips is on the bias, now sew them together like regular binding and finally, once you have all of your binding in one length, press it in half wrong sides together.


Now, you have all of your supplies ready to go, and you are ready to get started.

First, leave a 10 inch segment of your bias binding loose, and start in the middle of the high point in your binding.

Line up the cut edge of your binding to the edge of your quilt, and mold the binding around the curve, sewing a quarter inch from the edge of the quilt.


As you approach the V-corner, put your ruler at the intersection and mark the binding at a quarter inch in. Sew to this point. and backstitch 3 stitches. 


Now, the hard part. Cut an 1/8" snip in the binding only, from the inside edge of the binding. Now move the binding over and re-align it with the next curve. Pin it in place, and restart your sewing where you stopped the previous round.


And now, the piece that makes it all work....the template. Fold the quilt right sides together and line the template up and mark the V from the template onto the fabric.

now, sew on the V that you just marked., and then cut out the V using an 1/8" seam allowance. You will be trimming out a tiny V Literally tiny. But it makes all the difference in making the binding lay flat on the back. Now go back to the front, you will now have a pleat in your binding.....Now go all the way around the quilt repeating this procedure at each and every dip (that's the tedious part that I mentioned earlier).


Now, turn over to the back, and pin the pleat of the binding to a point a 1/4" in from the interior point of the quilt. Now, use your Roxanne's glue baste it glue to secure the binding until you can complete the hand sewing.


Friday, May 16, 2014

Stash Reduction Update

So, a couple of weeks ago I mentioned my intention to reduce my stash significantly. Many of you know that I love scrap quilts and if 5 fabrics are called for, I will probably use 25. If it calls for a yard of navy, I will usually use 4 fat quarters or 8 fat eigths, or depending upon the pattern, even little bitty bits.  I've been part of Bonnie Hunter's Scrap User's system for about a year, consciously preparing and then using my scraps.

So, that's only part of the background....I have moved 6 times in 10 years...and each time, I have had a couple of boxes that just "lingered" in the sewing room -- they didn't get fully unpacked or they were made up of bits and scraps and pieces.....so, this time, I spent a lot more time prepping the move. I made multiple trips to AmVets, the salvation army and the diocesan closet. I got rid of a bunch of "stuff" both quilty and not. Books that I would never read again, sheets for beds I no longer own. And a million other things that I either didn't use or didn't love.

But fabric -- fabric is not so easy to get rid of. It calls to me, it speaks to me, it asks me to use it. I did get rid of the scraps that aren't quilty related or that I didn't think I would use. I kept some linen and some burlap, that I invision pillows out of..... but I got rid of my old school uniforms (that I had once planned a quilt around), some microsuede, some taffeta scraps from a hideous bridesmaid dress, and a couple of scraps that friends had "gifted".....needless to say, I did get rid of some fabric, but I must admit that most of it stayed.

So, I moved into the new house with 40 WIPs -- each in its own box, neatly organized and most with the fabrics and patterns in the box. That's 40 quilts that I have started in some way. That doesn't count the PIGS (projects in grocery sacks), or the planned quilts, that I haven't actually bought fabric for. So, that's 40 projects that I started in some way and need to either finish as planned, resize based upon what I have already done, or give away. SO, I checked and made sure that I had updated everything onto my quilt spreadsheet (yes, I have one of those), and prioritized them. Time to get to work!!!!

In addition, I have 27 boxes of fabric. The fabrics are divided by color, but not be size...with the exception of the items that have been pushed into the Scrap User's System. Which represents a VERY small segment. Needless to say I have a lot of work to do.....

So this week I did the following :

  • Opened and sorted 3 boxes, removing everything with less than a fat quarter and putting it into the scrap user's pile.
  • I also sorted those same boxes into small, medium and large pieces -- larger than a fat quarter, but smaller than a a yard and a half went into the small pieces pile, anything from 1 1/2 yards to 3 yards into the medium pile, and anything more than 3 into the large pieces pile. 
  • I worked on a couple of the actual WIP boxes. At the moment I have 3 empty ones. Osprey's Nest, Forever Yours and Sunshine. My goal is to empty 5 a month. 
  • Made a couple of pillowcases, and couch cuddle quilts for the family.

So, here's the low down on the usage since the last update :
Osprey's Nest :
9 yards of brights
9 yards of darks
1 yard of binding (already made and in the binding drawer)
Due to the number of seams, I wanted to minimize the seams on the back, so I did buy a 108" back, rather than piece a backing....but I only bought what I needed, so that it a wash!!!

Sunshine
1 yard sashing
2 yards border fabric
16 fat quarters (4 yards) pieced backing
I didn't count the blocks, as they were already made....

Forever Yours
1 yard of background
1 yard of backing 
Again, the blocks were already made, so they didn't get counted.

Miscellaneous sewing
2 yards chevron minkee (Dax)
1.5 yards star wars
.75 black border  fabric
1 yard lips
1 yard minkee

Total Depletion : 34.25 yards

Wow....I guess I got a lot more done than I thought. I hadn't really thought about it until I wrote this post. Maybe I am making progress.....

Now, to keep it up!!!!

And here's a few picks, though not all of them.....a few I have to wait to share....


What are you working on this week???


Wednesday, May 14, 2014

Quiltscapades

What are quiltscapades? That's the affectionate term that I use for adventures related to quilting.....sometimes it us the mad dash to the local quilt shop for fusible batting minutes before they close, sometimes it is the search for an illusive fabric (which might or might not be in my sewing room). Occasionally it is an activity at a retreat....basically anything ridiculous, funny, or even ads that is related to quilting....

So today's quiltscapades? Fabric hunting. As in I need a 6" strip of a specific fabric, which i know is in my stash, but I have no idea where....so let the unboxing begin!

See you tomorrow for the next installment of quiltscapades.....

Tuesday, May 13, 2014

2014 BOM - May

Well, it's almost the end of the day, and apparently I scheduled this post incorrectly, because I started getting emails about when I was posting the BOM....which I wrote up and scheduled for the 13th of the month for the remainder of the year some time in March....apparently, there is a change in the functionality, and most post was sitting in a pending status, so, sorry about that!!!! And here it is....


I made some changes this month -- specifically, I used some batiks with cottons, and moved to a darker and flatter "background" -- mainly because I wanted this month's example (which will become a pillow (as have most of my samples)) for someone else's house. Someone who is much younger and as a result much much hipper than me.....

So, here we go....

Cut 4 - 4 7/8" squares from your focus fabric (multi colored batik)
Cut 2 - 4 7/8" squares from your star fabric (black)
Cut 2 - 4 7/8" squares from your corner fabric (grey)
Cut 1 - 4 1/2" square from your star fabric (black)


Now, let's mark and sew the HSTs. I would normally draw a line on the wrong side of the batik print, but in this case, it was too busy to see it, so I marked the solids (black and grey). The black was a little tricky, so I used my herra marker, instead of a pencil, though you could also use a chalk pen or a sewline pencil. As long as you can see it, it works! Now, place the solid 4 7/8" squares with the batik ones, (2 grey + batik, and 2 black + batik). 


Now, you will sew on both sides of the drawn line, use a matching thread. I used a super light thread so that it would show up in photos. 


Now, cut them apart on the drawn line, and press towards the solid.


Now trim off the dog ears.


And layout your block.....


Now sew the rows together, press the top and bottom rows to the right, and the middle row towards the left, and sew the rows together.

Done.

Enjoy!!!

Happy Quilting!!! See you next month!

Catherine


Monday, May 12, 2014

Osprey's Nest


I've been working on my Osprey's Nest on and off for a few weeks....and I finally managed to get it all done....Overall, it was a really easy one, but very time consuming, since the pieces finish at 1". Yes, they are cut at 1 1/2". Of course, I took my pictures, boxed up the quilt and THEN realized that it was upside down in all of my pictures. Typical Catherine.....


I did make some change to the pattern to get the effect that I wanted, and I did want to make sure that you knew in the event you want to repeat this one.

1. I reversed the lights and darks. If you look at the original pattern you will notice that the darks are along the edge, and the center "paths" are light. I reversed these, making the pattern's darks into brights, and the pattern's lights into dark blues. I also chose to scrap both the lights and the darks. In the pattern, only the darks are scrappy. I made both scrappy, because if 9 fabrics is good, surely 18 is better. Right?


2. I added additional fabrics. In a couple of different locations. In addition to making the darks scrappy, I also made the dark geese scrappy to carry through that scenario. In addition, I chose a separate set of fabrics for the bright geese, since I wanted the geese to "color wash" and there were only 9 fabrics in the body component, and 12 geese. Since I was adding at least 3, I decided to choose clearer colors for the geese that I had for the logs. So, I actually added 6 fabrics for the bright geese, and left a few out (for example, there are no purple geese). This was done mainly because I needed fabrics that were enough contrast to the navy blues that they could stand out, and the purples just couldn't do that, so they got replaced. I also ran short of the original pinks, so I had to replace those....

And that folks is Osprey's Nest. It might be my favorite Judy so far. Which is saying a lot. I love the traditional-ness of it (is that a word???). I love the modern-ness of it. I just love it all around. 

I dropped it off at the quilter, and now I am anxiously awaiting its return.....

Now, what project should I work on??? Oh, the pressure....

Happy Quilting!

Catherine

Sunday, May 11, 2014

Celtic Wave QAL

Well, we are nearing the end of this QAL, and while part of me can't believe it is almost over, part of me thinks it has been going on forever.


As I mentioned 2 weeks ago, I played catch up this cycle. I managed to get my curved piecing done, and am now ready to move on to the final layout and assembly. 

Here are my outside curves....with darker edges...


And here are the inners....


Which means I am all ready to assemble....


Time to use these that I cut last time to complete the final assembly....


Now, time to get this up on the design wall....


Here's a quick refresher on what we have next.....

Checkpoint 7 : May 12 - Start Assembly
Checkpoint 8 : May 26 - All DONE!!!!

Can you believe there is only one more check point???

How are you coming along on getting your Celtic Wave done??? Is anyone interested in doing another one of these??? I think I will take a couple of weeks off, but then I might start another one....the only question : Which one???


Happy Quilting!!!

Catherine